Pages

Thursday, June 9, 2011

Hand Carding is Harder than it Looks

Yesterday I received a wonderful gift from a friend of mine.  She gave a beautiful set of Howard Brush Hand Carders (http://www.woolery.com/store/pc/Howard-Brush-Hand-Cards-p4324.htm).  This very fine carder set is 190 TPI (teeth per inch) and 8 inches long.  The carders are flat and made from lovely wood.  The handles fit just perfect in my hands - my hands are large for a woman so I was happy to see they were not too skinny.

Armed with a playlist of videos on YouTube, an iPad, some alpaca roving, and of the course the carders, I started on my journey into an old tradition of hand carding.

The videos made the carding actions look very simple.  No problem I thought.  Well - there were problems.  First of all, I am a lefty.  It took me some time - almost an hour - to translate the actions of the right handers into actions for a left hander.  In the process of doing so, I snagged two teeth on my carder (which I was able to bend back) and pretty much make a giant mess of my wool.

So, as I tell my 4 year old, KEEP TRYING!  I continued to basically hack away at the wool until I finally accomplished something that sort of looked like a rolag.  I continued working for about three hours and made a sort of batt.  By laying it all out, I did see I was improving.  I will continue to keep trying tonight.

My major issue is that I keep getting bits of rolled fiber sneaking in from the edge toward the handle on the top carder and making a "line" in my rolag.  Guess this is one of those things I just have to work out from practice.

Tuesday, June 7, 2011

The Great Alpaca Experiment: Part Two

I hope Part One was informative,  so here is part two.  After letting the roving dry for about 24 hours, I decided to try out making a home made hackle.  I found instructions for making a hackle using plastic hair picks, a 2x4 cut to size, and some screws.  (I will blog another day on how I made it and the results of it.)  I used the new hackle to blend up some of the roving I had just dyed.

I combined dark red roving (light fawn alpaca dyed with red) with the natural black alpaca I had in about equal proportions.  I also combined to two other "weird" colors with the black.  The results of this were pretty cool and I plan to use them in a small project.

I also used the hackle to make thicker roving out of each of the other colors.  I also found that by putting the other colors through the hackle, the few white spots from the ties I had in during the dye process pretty much disappeared.

PROJECT ONE:  A HUGE SCARF TURNS INTO A HUGE FAIL

So I decided to take on a very large nuno felting project using the combination of the natural black alpaca and my newly dyed black/red alpaca mix.  I won't go into gory details - but I made a few mistakes.  I will share them here.


  1. I made a very bad choice of fabric for nuno felting.  I had some fabric left over from my curtains that was a very sheer and very slick polyester.  I thought it being so sheer it would work just fine.  Turns out I was very wrong.  I think the slickness of the fabric prevented the fiber from catching through.
  2. My natural black alpaca apparently had a lot of guard hairs still left in it.  I am not experienced in alpaca and did not really realize this until I went to full the project.  The @#$@#$ thing started shedding.  I mean there were black hairs everywhere!!!  I ended up just quitting after my whole bathroom was full of black alpaca hair at 2 AM on a work night.
  3. Alpaca felts more slowly and I was rushing.  I found out the hard way that alpaca felts much slower than the merino wool I have been felting with.  It is not a project to be had when you start felting at 10PM at night.
The project was a bust, but I learned a lot.  This lead me to do some smaller experiments to try to see exactly what went wrong.

EXPERIMENT ONE: DARK BROWN ALPACA ON SILK CHIFFON

I have been given a lot of fabric scraps over the years - I have been sewing since I was 6.  After my nightmare of a fabric selection on my first project, I searched out some silk from my stash.  It was a sort of "old lady" looking print I had been given as a gift from a coworkers trip to Chine - his mom had picked it out. But, it was the only real silk I had.  I chose the chocolate brown for two reasons:
  1. I wanted to see if the dark chocolate would shed like the black, and
  2. It matched so well with fabric.
I layed out two layers of wool and place on it a wrist cuff sized piece of fabric.  I then used a pretty typical nuno felting process and timed my rolling time.  I rolled the piece for a total of 25 minutes, then fulled it by throwing it in the sink.  To my surprise, it barely shed.  It also scrunched up beautifully, just like I have seen in pictures.  Here it is after drying:


EXPERIMENT TWO: BLACK ALPACA ON COTTON GINGHAM

I have a large supply of very thin cotton gingham my grandma gave me from our childhood projects.  I thought maybe it would work since it was not slick and very open weave.  I also wanted to try the black alpaca again to see if I had just made a mistake before.

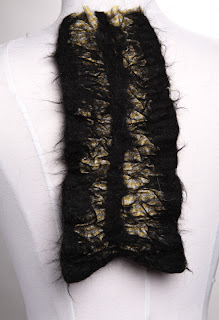
I layed this out in the same shape, size, and method of the silk chiffon experiment.  This took by far longer to felt and the gingham didn't nuno felt as well.  The piece still shed horribly while fulling, but only slightly after it dried.  It also appears very hairy - like monster fur.  Here it is after drying:


EXPERIMENT THREE: WHITE ALPACA DYED YELLOW ON COTTON GINGHAM SCARFLETTE

The final experiment was to make a scarflette using my dyed yellow alpaca and the cotton gingham I had used in experiment two.  I laid it out just as I did in experiment two with the change in overall size and an additional two layer strip of white alpaca over the cotton gingham.  Here it is:


I hope you like this post.  My next post will be on dyeing using AmeriMist liquid airbrush icing color.

Monday, June 6, 2011

The Great Alpaca Experiment: Part One

Sorry for the delay in posting, but the past week I have been experimenting with my alpaca fiber. I have created two works and some some mini experiments. Some things worked great and others...not so good.

THE PREPARATION

I started my rub with my new alpaca roving with an experiment in how it dyes. I used both food coloring and kool-aid. I tried four colors on white alpaca roving and three colors on light fawn alpaca roving.

I started out by measuring off one ounce lengths of fiber. I zig-zagged the roving and tied it loosely at each end. I have been using hemp cord for this, mostly because I had it left over from another project.

I soaked them all in large bucket of 1:3 vinegar to water solution. I let them sort of float on the surface and then slowly - very slowly - pushed the wool into the solution using my whole hand to avoid any accidental felting.

I let this whole thing sit in my garage - where the vinegar water had been acclimating for a day or two - for about four hoursnwhile I ran errands for the day. I figured being out of the house would prevent me from messing with it and felting it on accident.

THE DYES

I mad the dyes using kool-aid and food coloring.  The kool-aid colors where orange, red, and purple.  The other colors were used creating Chef Master powder food coloring.

I created the dye by filling a pint jar (stolen from my husband's canning stash) with boiling water.  For the kool-aid dyes I simply added packets of food coloring to the boiling water.  For the food coloring, I added a hefty spoon of citric acid and "smidges" of food coloring powder.  I have a set of very tiny measuring spoons that came with my last set of stainless spoons that are labelled "smidge", "pinch", etc.  I stole them for my dyeing since we seldom use them for backing and they are perfectly tiny for measuring dye quantities.

I don't have my recipes for the dye yet, but I have a large batch of AmeriMist airbrush liquid color coming in the mail.  I plan to dye a sample of each color and will blog those recipes exactly.

After mixing everything up well, I put on the canning lids and set everything in my garage to acclimate to the same temperature as the wool in the vinegar water bath.  Everything sat for about 4 or 5 hours.

THE DYEING

After running my errands for the day, I setup my space.  I decided to try dyeing in jars and using the steam method for setting they dye.  I put each ounce of wool into a large jar and poured in enough dye to cover.  I then put the lid on the jar and carefully turned it upside down and rightside up, then slowly rolled it to move the dye around the wool.  Looking back on it, I should have untied the roving before putting in the jars as I got lines from the ties.

I put all of these in my large canning pot with the rack in the bottom - just the one that came with it turned upside down so the jars sit flat.  I added enough water to almost reach the jars and then put on the heat. I put on the lid and after steam formed, I timed 35 minutes for the steaming.

Here are the pics of the wool in the pot:


After the wool was steamed, I took the jars out - VERY CAREFULLY!!  I set them on the side and let them cool for about an hour: no touching = no felting.  After that I turned the wool over on a baking cooling rack to drain the water and did not move it until it was room temperature.  I then rinsed the wool using room temperature water and soaking it in small bucket about two times.

I hung it to dry on a clothes line.  Here it is drying:


THE DYEING RESULTS

The four colors on the white roving came out pretty much exactly as I expected.  The light fawn roving gave me mixed results.  The red dye on the light fawn came out a wonderful shade of deep red.  I love this color and will dye more like this.  The purple and the blue dye came out very weird and spotty.  The purple dye on the light fawn roving resulted in this odd muddy brown color with a hint of purple.  The blue dye on the light fawn roving resulted in this yucky green color.  I do end up "saving" these two colors by blending.  More about that in Part Two.


I will be posting what I did with the wool in part two later this week.

Saturday, May 28, 2011

Alpaca fibers galore!

On Friday I received a shipment of amazingly beautiful alpaca fiber from Dodge City Alpaca Ranch and I am so thrilled.  The beautifully musty smelling package contained a wide range of natural (occurs in nature) colored fibers.  I purchased one pound of roving from each fiber at an unbelievable price.  I highly advise using this farm for your alpaca needs.

*Please remember that your monitor calibration can make colors look different than real life.  I tried be certain these were as accurate as possible in color rendering.*

Here is what I purchased.

Natural White Alpaca Roving
White Alpaca

NOTE: This roving is the softest of all of the roving I received.  It is hard to describe just how soft this fiber actually is, but the full pound of it seemed like a giant pillow to me.

Natural Light Fawn Alpaca Roving

LightFawnAlpaca


Natural Medium Fawn Alpaca Roving

Medium Fawn Roving


Natural Dark Fawn Alpaca Roving

DarkFawnAlpaca_05-28-11_005


Natural Dark Brown Alpaca Roving
Dark Brown Alpaca


Natural Medium Rose Grey Alpaca Roving
Medium Rose Grey Alpaca


Natural Dark Rose Grey Alpaca Roving

Dark Rose Grey Alpaca

NOTE: This roving has an amazing color but is slightly rough.  I am excited to see how it felts.


Natural Black Alpaca Roving

Black Alpaca

NOTE: This roving is the roughest of the colors of alpaca.  The darker the color of the alpaca - the rougher the roving.  I do believe this fiber is still usable for scarves and was not nearly as rough as the Romney wool fiber I have had in the past.

Will Nuno Felting very thin cotton work?

Tonight I was going through my VERY large stash of sewing fabrics - 12 large tupperware style boxes - in search of fabrics to nuno felt upon.

I came across a box full of lace - which I have already discovered nuno felts very well due to its open structure.  I also found a decent amount of silky sheers, some synethic and some natural - all of which should nuno felt creatively.

But then I found a box of fabrics that were handed down to my by grandmother.  They are vintage cotton gingham that she used to use for baby clothes for me and my siblings.  The fabric is so alive with spring colors, baby blue, pale yellow, pastel pink, and other youthful colors.  The check is so tiny and unique, it is a fabric you don't find much anymore.  I never really used it in my sewing projects because I did not have a ton of yardage of it.

Unfolding it, I held it up to the light and sure enough the weave is open enough to both see and breath right through it.  So my question is - will it nuno felt?  I have some ideas, so soon enough we will all know how it felts up.  I plan to make a cheery springtime wrap with yellows and see how this fabric felts up.

Wish me luck!

Thursday, May 19, 2011

Welcome to my shop!

Hi everyone!  My name is Ariana and I am the proud creator behind Wooly Worms Felt Creations.

I am an accomplished fiber artist, photographer, software developer, seamstress, and mom.  I adore the world of fiber and love to make just about any kind of stuff I can think of.

Please have fun and enjoy my blog.  I plan to be her often, so lookout.